Everything you ever wanted to know about photography, but were afraid to ask.

Welcome to my Photography Blog

This blog is aimed at everything photography, and help you on your journey

DSLR Controls

Ever wondered what the controls on your DSLR camera do, now you can find out.

Canon or Nikon

So which should you buy Canon or Nikon, or neither?

Portfolio and Casting Call Websites

Sites to help you advance your photography.

Showing posts with label 7d. Show all posts

Friday, 25 March 2016

What is the difference between TimeLapse and HyperLapse Photography?

After posting about doing some TimeLapse photography and my test shots, I had a few people ask me what is the difference between Timelapse and HyperLapse.

So I thought I would answer them in a post, so here goes.

I will start by briefly explaining what the two are in their own right, and hopefully you will be able to see the difference.

What is TimeLapse Photography?

I will start by showing you a simple example of a TimeLapse sequence


As you can see the movement in this shot is done by the lapsing of time, hence the name TimeLapse. Simply put in a TimeLapse shot the camera position is fixed and a shot is taken at set intervals, during each interval time passes, which means when the next shot is taken the scene has changed.

These shots are then stitched together into a moving format, gif, movie or similar.

What is HyperLapse Photography?

Once again I will show you an example of a HyperLapse sequence


This time rather than the camera remaining in a fixed position, the shot is taken by the camera which is then moved between each shot, hence the name HyperLapse. So simply put we get the effect by having a moving camera position and a shot taken at each position, each time the camera is moved to a new position a new shot is taken, (at each shot the camera is fixed and doesn't move) after each the camera is moved and physical distance has passed, so the next time the shot is taken the scene has changed.

Again these shots are then stitched together into a moving format, gif, movie or similar.

So what is the difference between TimeLapse and HyperLapse?

Now you should already know the difference by to put it simple the difference is

1. Time-lapse photography allows time to pass between each shot, whilst the camera remains fixed.
2. Hyper-lapse photography allows distance to pass between each shot, the camera moves between each shot, but is fixed at the time of taking the shot, after all we are not making a movie here.

NOTE

TimeLapse is often also referred to as Time-lapse or Time Lapse Photography, as HyperLapse is often referred to as Hyper-lapse or Hyper Lapse Photography.

Thursday, 27 October 2011

DSLR Controls - Front Controls

I must start first off by saying that the shots in this post are of my Canon 7D and whilst most Canon cameras all have the same layout, Nikons do not. This does not really make a lot of difference as the operation of most DSLR cameras are the same, and whilst the buttons may not be in the same place, they do operate in the same or similar way.

Also another important note is that you can program the buttons on most DSLR to do different functions as you prefer, the diagrams and descriptions although are correct for the functions may not operate the same as your camera as these layouts are the default layouts.

The way this will work is I will cover each side of the camera in turn, Back, Front and Top. I am not going to mention stupid things like where the batteries go, or how to attach a strap but the more necessary things as well as somethings that when I first started I just could not figure out. Also I have changed the names slightly to help you make more sense of things and not be too technical.


Front of DSLR
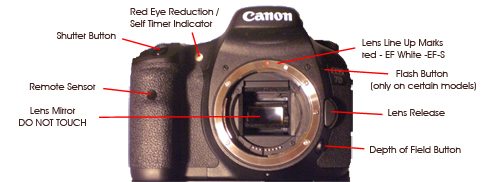
Front of Canon 7D


The front of most DSLR cameras looks the same with the lens mount being in the middle with a release button to allow you to remove it.

Again I will start at the bottom left of the picture and work clockwise.

Lens Mirror

When you remove your lens and see inside your camera, you see the lens mirror. this is the bit that makes you camera an SLR and allows you to see through the viewfinder.
DO NOT TOUCH OR PUT ANYTHING IN HERE.

Remote Sensor

This is the sensor used by the camera when being operated by infrared remote control, it is not the same place that a remote camera cable release would use.

Shutter Button

The button your press to actually take the photo, at default settings pressing half way down will start focus and lock exposure, full press will take the shot.

Red Eye Reduction / Self Timer Indicator

This little light is a dual purpose little fella, when using the self timer it flashes to let you know when the shot it going to be taken.
It also works to reduce red eye in your shots.
Lens Line Up Marks

On all DSLR there is a mark to show you where to connect your lens. On some makes of Canon which take both EF and EFS lenses there are two marks.
Red for EF lenses
White for EF-S lenses
To connect a lens simply line up the make on the side of the lens with the mark on the camera and turn.

Flash Button (only on certain models)

On models with a built in flash there is a button to pop up the flash when you need it. This is normally only needed in manual modes as the flash will pop up automatically when needed in auto modes.

Lens Release

To the left of the lens mount there is a large button, this is to release the lens in order to remove it from the camera. Just press the button and turn the lens to remove.

How to attach a lens to a DSLR
In order to attach a lens to your DSLR camera simply do the following
  1. Remove the lens cover and lens cap from your lens.
  2. Line up the white or red mark at the base of your lens with the white or red mark on the lens mount on the camera.
  3. If the marks are lined up correctly the lens will just slip onto the camera, do not try to force it, if it does not just slip on you have not lined it up correctly.
  4. Now turn the lens, normally clockwise, until it clicks. Your lens is now on your camera.
How to remove a lens from a DSLR
To remove a lens from your DSLR simply do the following
  1. With one hand press the Lens release button (normally to the side / left of the lens)
  2. Now with the other hand turn the lens, normally counter clockwise, until it comes of the camera. It does not take any force to remove the lens so if it feel stuck make sure you have pressed the release button. Your lens is now off your camera  
Depth of Field Button
On certain DSLR such as the Canon 7D there is a depth of field preview button, pressing this shows you the best depth of field for your chosen settings.

Final Note
Most of the camera buttons have a dual function and in order to make adjustments you need to use either the rear dial or the top dial depending on what you want to change.

DSLR Controls - Left Controls

I must start first off by saying that the shots in this post are of my Canon 7D and whilst most Canon cameras all have the same layout, Nikons do not. This does not really make a lot of difference as the operation of most DSLR cameras are the same, and whilst the buttons may not be in the same place, they do operate in the same or similar way.

Also another important note is that you can program the buttons on most DSLR to do different functions as you prefer, the diagrams and descriptions although are correct for the functions may not operate the same as your camera as these layouts are the default layouts.

The way this will work is I will cover each side of the camera in turn, Back, Front, Top and Left. I am not going to mention stupid things like where the batteries go, or how to attach a strap but the more necessary things as well as somethings that when I first started I just could not figure out. Also I have changed the names slightly to help you make more sense of things and not be too technical.


Left Side of DSLR (under flaps)


Left Side of Canon 7D

The diagram above is the left handside of the Canon 7D and again is used as an illustration of what is typical on most DSLR cameras.
I will start from the bottom left of the picture and work clockwise.

Remote Shutter Release
This is where you attach a remote camera shutter release / trigger cable.
PC Terminal / Flash Sync Cable

This is used to connect flash (strobes) that have a PC sync connection via a PC Sync Cord for remote triggering, or to connect a studio flash unit using a PC Sync Cord.
Microphone
This is for use with an external microphone for use during video recording.
USB connection / non HD video output

This connection has two main purposes
  1. To connect the camera to a computer using a USB cable in order to either control the camera remotely for view and print photos on the camera. (some DSLR's can also print directly via a USB cable to compatible printers)
  2. To play back video using the AV cables provided. (NOTE this will play back video in non HD format)
HD Video Output
This is used to play back video in full HD format using a mini HDMI connector.
Final Note
The connectors above are on the Canon 7D and whilst most DSLRs have the same connectors they may not all be in the same place, notice should be take to the fact that not all DSLRs can shoot video or HD video.

NOTE the connections are normally located under either a plastic or rubber cover.