Everything you ever wanted to know about photography, but were afraid to ask.

Welcome to my Photography Blog

This blog is aimed at everything photography, and help you on your journey

DSLR Controls

Ever wondered what the controls on your DSLR camera do, now you can find out.

Canon or Nikon

So which should you buy Canon or Nikon, or neither?

Portfolio and Casting Call Websites

Sites to help you advance your photography.

Sunday, 8 January 2012

Whether to take Photo With or Without a Reflector

Although I have spoke of this in another post, loads of people have asked me if they really do need a reflector and why.

The first thing to remember is the most important thing in photography, and that is light. Without light you dont have any shot at all, so getting the right light is crucial. There are several ways of getting the light right, and playing around with it, everything from using the light available to you, known as the ambient light or using flashes and strobes, known as artificial light.

What is a Reflector

A reflectors main purpose is to reflect available light in order fill in any area you are missing light, the actual light you choose to reflect is up to you.

The benefit of a reflector over another light source is in the name it simply reflects available light onto an area you wish to light up on your subject, without being too over bearing.

When to use a Reflector

A basic rule as to whether you need to use a reflector or not is to ask yourself. "is your subject lit up enough for the look you are going for?", remember although there is such as thing as a technically perfectly lit shot, you know the one the histogram being right in the middle, there is no reason to always aim for this. Remember photography is an art and if you want to shoot different images from perfection and thats your style thats fine.

Using the reflector to just create a bit of a catchlight is fine, you dont always need to use it to completely light up your subject.

Reflector Technique

So you may be thinking now you know what a reflector is for, but when do you use it. The simple rule of thumb is you need to use a reflector when part of your subject are dark, this darkness can be solved by using another light, but this can be over powering on your subject, by using a reflector you are only ever reflecting back available light, and as such it will always be less powerful than the original source.

A quick tip is to remember the further away the reflector is from either your subject or the light you are reflecting the less intense the effect, also remember that by tilting you reflector you can also reduce the effect on your subject.

There is also an added bonus in that is it way cheaper to buy a reflector than it is to buy another light.

Practical Example

Photo Taken with and without reflector

If you look at the shot on the left above you can see that although you can see most of the face, it just looks too dark. Now if I used another light the subject would be too lit up and I would lose the effect of the image, so the solution is to use a reflector.

Now if you look at the image on the right you can clearly see that by using a reflector we can now see the subject more clearly without the light being too over powering on the face.

Big thank you to Jenna for being so patient during this shoot.

Final Thoughts

So I would suggest that even if you are just starting out, go and buy a reflector as they make your job as a photographer a whole lot easier, and remember to buy a 5in1 reflector that way you get the ability to not only reflect white light but also gold and add that something special to your shots.

Saturday, 10 December 2011

Fashion Brand H & M use Computer Generated Models in Latest Lines

Well I am all for a bit of photo editing, the odd blemish removal, exposure correction but clothing brand H&M have taken this to a whole new level.

Now let me start of first by saying I love H&M, I love the clothing styles and the photography I find very inspirational, but their latest vision has just gone way to far.

So what have they done

H&M have decided to use computer generated models in their latest campaign, they have taken a head shot of different models and added this to the body which has been completely built using computer software.

I think this is taking the whole use of computers in photography a step too far, I mean there are lots of wonderful models working out there, there are great make up artists and stylists, not to mention photographers. So why go in a direction that is not normal.

I find the normal shots of the H&M lines to be great and very natural, and normally taken on location with superb lighting and composition, but to decided to use fakery in your campaign is a step too far.

So my words to H&M are your clothes are wondeful and your ranges are too good to go and wreck it all by trying to save money and create artificial imagery.

If you check out the H&M site and look in the Swimwear section you can see the use of these images.


Final Thought

So my final word to H&M is to use real people for your campaign, this goes for the models, make up artists, photographers and the editing team. Remember "People buy from People" not computers.

Monday, 28 November 2011

To Post Edit or Not To Post Edit That is the Question?

Well over the years the debate of whether you should post edit your shots or leave them as they come out of the camera, has been one that provokes a bit of a mixed reaction. Some photographers are all for post editing and some photographer are heavily against post editing.

Myself I sit kinda on the fence a bit, I believe that it is possible to get a great shot straight from your camera and it not to need any post editing at all. However I think this mainly applies to certain areas of photography such as landscape photography, as you can take a shot that just works and although you can add something using post editing techniques, landscapes can look best just left alone.

NOW

When it comes to getting and being published and in particular fashion and portfolio work, this is where I think that post editing is almost a must. Put it this way if you are taking shots of a model for their portfolio, you want them to look their best and this although possible to do straight from camera, is best done with some form of post editing, and although most editing I do is minor I feel it adds to the shot, and in my view the best editing is, particularly high fashion, when you dont know and cant tell the shot it edited, and in any publication you buy the shots will have had some form of edit to make them work.

One area that always users post editing is that used by digital retouchers and digital artists, who can take an ordinary shot and make it into something spectacular, and this is where post editing really shows its worth, this can also be recovering old photos to their past glory.

OK so there are some people out there who say that they never edit, and I know that I can take a shot that looks great straight out of the camera, after all thats the art of photography, but as I always shoot in RAW I am required to use post editing to make the shots usable. So anyone who shoots using RAW format will always post edit their shots.

What does Air Brushing Mean?

You may have heard the term "air brushed" used in the press and on TV and have always wondered what it means, well its simple really its the term used when an image has been altered using post production tools such as PhotoShop, so other common terms are photoshopped but in essence they are all the same.

OK now for an example

If you take a look at the shots below, do you think these are straight out of the camera?


Did you guess right, these shots look just fine and you may be thinking, yes these look good so why do you need to post edit. Now look at the shots below.


Now you can clearly see why I think, particularly in fashion photography, post editing is a must. I agree that the best editing is done so that the shots look like they have not been touched, and this is what I hopefully achieved in the finished shots. Oh in case you cant guess the first two are the finished edited versions.

So it is my view that post editing techniques are something that are required in any professional photography, its kinda like the polishing stage. Its not to say that their is anything wrong with the shots before post editing, its just that without this finishing you are not giving the model, makeup artist, stylist and client the best they can get.

Now I admit that I am not a digital retoucher I am a photographer, I just know enough to make my images work, I think that if you want that something extra in your shots such as fantasy, special effects, etc its better to get a professional digital artist / retoucher than to do it yourself. So my photoshopping limits go as far as smartening up my shots and thats it, if I need anything else I use a digital retoucher and you should too. Remember there is a huge difference between simply making minor tweaks to your photos and digital retouching, so dont let anyone tell you anything different.

Bit of an Update

After getting loads of people talking about editing, and after spending a bit of time trawling the web, I thought I would see if I could find a good resource for editing and a basic how to. Thankfully this wonderful web comes up trumps some times and I found a great site by Evan Sharboneau with loads of tips on how to create great photos by editing. Please go and take a look and get a copy of his great E-Book now

Friday, 25 November 2011

Canon 7D Soft Focus and How it Fix It


Ok so you have just bought your nice new Canon 7D, and whilst it works great you are finding that some of the shots you take using the Autofocus (AF) are not quite  in focus, they look soft. So is it the camera or is it you?

First off it’s possible it could be either or both, you or the camera, so I am going to address the latter here, the camera.

Now there are two things to try to fix this issue without the need to send your camera off to the shop for recalibration.

Remove the 2 camera batteries

Open the battery compartment on your camera and take out the main camera battery, now remove the system battery. This battery is the one that is responsible for storing your user setting, dates, etc.

The system battery is located inside the battery compartment on the left, if you hold the camera upside down with the lens facing you and the battery compartment on the top, you will see the system battery holder inside to the left of the main battery compartment.


Now leave both batteries out of the camera for at least 10 minutes, this will allow the camera to completely discharge.

Now reinsert the system battery and the main battery. Hopefully your autofocus problems will be solved.

However if they are not, you may need to use the inbuilt Micro Auto Focus Adjustment functions, now whilst there are lots of different way to make change to the camera Auto Focus system. I am going to concentrate on the one that is fairly straight forward and doesn’t require you to buy anything additional to do the testing and adjustments.

This technique is known as Moire Fringing.
 
Moire Fringing

In order to make changes to the camera Auto Focus system using Moire Fringing there are a few things you need to have or know before your get started.

1.      The Moire Fringing Chart, you can download it here

2.      An available computer and enough room in front of it to be able to mount your camera on a tripod / stable surface and get the entire screen in the frame.

3.      Know where to find the Auto Focus Micro Adjustment settings on your cameras

a.      On the Canon 7D the settings for Auto Focus Micro Adjustment are located in the Fifth option in the third Custom Functions (CIII) Menu (Auto Focus / Drive)

            i.      Press the Menu button on the back of the camera

            ii.      Use the top scroll wheel to scroll to the Custom Functions Menu (the second to last icon on the menu list)

            iii.      Use the Main Scroll wheel on the back of the camera to scroll down to C Fn III then press the set button


               iv.      Use the Main Scroll wheel on the back of the camera to scroll to the fifth option, so number 5 is shown at the top right.

              v.      You should now be in the C.Fn III Autofocus/Drive AF Microadjustment screen


To find out more about Moire Fringing and some other great techniques I recommend you take a look at the video by Jared aka Fro Knows Best

Camera Testing Setup

1.      Download the Moire Fringing chart, if you have not already done so, and load it up on your computer full screen, so it completely fills the monitor or as near as you can get. NOTE you cannot print the Moire Fringing chart for use as it’s the viewing it via your monitor that gives us the effect we need.

2.      Attach a lens to your camera that you wish to test and adjust, we are going to make adjustments to the lenses individually so pick anyone, or just the one you think is focusing a bit soft.

3.      Mount your camera on a tripod or other stable surface in front of your monitor.  The camera ideally has to be a far enough away from your monitor as possible so that when you zoom your camera lens to its furthers zoom, i.e 300mm on a 300mm lens the whole of the Moire Fringing chart can be seem in the view finder. Now in practice this is not really possible, unless you happen to live in a castle or other equally long room. So in reality just make sure your camera is as far as possible from your monitor as you can get it, and then use the furthest zoom possible to fill the view finder with the Moire Fringing chart. Try to avoid fully zooming your lens to its widest point i.e if you have a 28-300mm lens try to get as close to 300mm as you can whilst keeping the chart in the view finder.

4.      Please note you can use which ever mode on your camera you normally use, Full Auto, Full Manual, AV, TV, P but just make sure what ever setting you use you can clearly see the full Moire Fringing chart in the view finder. Unless you are noticing that your photos are soft at a particular F Stop (F8, etc) in that case choose either Full Manual or AV and set the camera to the required aperture you feel is soft. But again make sure you can clearly see the chart in your view finder.

5.      I also recommend using either a centre focus or spot focus for testing, and focus on the centre of the chart.

 Testing

Ok first off the idea behind the Moire Fringing chart is to try to get as many concentric circles in your view finder as you can.

The correctly focused image should look something like the one below


 Ok so lets get started with the testing and adjustments. I am going to list the process of testing and adjustment in order to hopefully make it easier for you to understand and follow.

1.      Set your camera to Manual Focus and focus manually on your monitor with the Moire Fringing chart loaded and your camera at a distance to allow for the complete chart to be visible in the view finder, you are trying to get an image similar to the one above showing the Moire Fringing chart and several concentric circles on it. Now take a photo

2.      Next switch your camera to Auto Focus and set your focus point on the centre of the chart of take a photo.

3.      Now go into the C.FnIII Autofocus / Drive AF Microadjustment menu (as described above) and select the Adjust by lens option (we are selecting this option as not all lenses focus the same and you can repeat the process for each lens you are having problems with), to select the option simply press the set button, then use the big scroll wheel to select the option then press the INFO button. You should now be on the following screen


4.      Make sure that the Marker on the bar is set to 0, then press the set button and then use the menu button to exit the system menus. Now take a photo again making sure you are using Auto Focus and you are focusing on the centre of the chart.

5.      Next go back into the screen, as shown in figure 4, and using the scroll wheel move the marker to +5, then exit the menu and take another photo. Now continue this process and each time you enter the AF Microadjustment menu change the marker in increments of 5,  so start with it +5 then take a photo at  +10, +15 and +20 and each time exit the menu system and take a photo. After this set of shots you should have taken 5 photos, one for each increment starting with 0 then +5, +10, +15, + 20 in order.

6.      Now do the same this time starting at -5 and take a photo at the same increments, -5, -10, -15, -20.

7.      You should now have a total of 10 photos on your camera, one taken using manual focus and 9 taken using Auto Focus and at each increment along the AF Microadjustment scale.

Adjustment

Now you have a set of 10 photos taken on your camera, and you have made adjustments after each shot, you should have a set of shots similar to the ones below. If you took the shots in the order as advised above starting with Manual Focus, then starting with 0 doing the + adjustment then working through the – adjustments your shots will be in the order below.


You now need to do the follow

1.      Load the first shot you took your computer and view it at 100%. (the one your took using manual focus)

2.      Now load the other shots in turn onto your computer and compare each shot to the one first shot you took using manual focus. You are trying to find the shot that matches as close to this one as possible, showing the same amount of concentric circle as the Manual focused shot. The shots you took will be different slightly, and this different is normally very slight but can make all the difference between soft focus and tack sharp shots.

3.      If you look at the sample shot above, click on it to enlarge it, you can see that the there are two shots that are very similar to the manual focused shot and these are shots with adjustments of +5 and -5. You will notice that unlike the other shots taken at other adjustments you can clearly see the concentric circles around the centre of the shot.

4.      Ok so now you have your adjustment setting you need to go back into the camera AF Microadjustment menu (shown below) and set the marker to the number you think is the closest shot to your manually focused shot.


If the adjustment number is 0, this means that your lenses is focusing fine and doesn’t need any Micro adjustment.


Conclusion

If you use more than one lens on your camera simply repeat the steps above for each lens, you can make the same adjustment for all the lenses, but I recommend doing it for each lens, as I found that my Canon kit lens needed no changes at all by my Sigma lens did, also one other word of caution do not take any more shots than the 10 shots your need for testing as this will throw out your order and you won’t know which shot is done at which setting.

One final thought if you find that doing the above does not result in sharper images, you should firstly try to work on your camera holding technique or try tour camera using the timer and a tripod, but if this fails you may need to send your camera off to Canon for recalibration. However thankfully I was able to solve my own soft focus issues using the above technique.

Wednesday, 9 November 2011

Canon 1DX Now officially launched

I just thought I would post and make you all aware that the Canon 1DX is now officially launched, and as it is a full frame, 18 meg professional DSLR its going to be a great addition to any photographers tool kit.

The anticipated arrival date in most stores will not be until March next year, although there will be a worldwide roll out between now and then, so you may be able to grab one a bit sooner.

The main features of the Canon 1DX are

  • 18.1 MP full frame CMOS sensor
  • Up to 12fps plus 14fps High speed mode
  • 100-51200 ISO, up to H:204800
  • 61 point AF system
  • 100,000 pixel RGB AE metering
  • Full HD 1080p EOS movie
  • Dual “DIGIC 5+” processors
  • Clear View II 8.11 cm (3.2”) 1,040k LCD
  • Ethernet port

  • for full product information visit the Canon website

    This will definately be on my wish list.

    I think thought that the initial rush to buy this new camera will not only push prices high, for at least the next 12 months, but will also make supplies limited. So if you are lucky enough to get your hands on one, let me know.

    Monday, 7 November 2011

    Newcastle Fashion Photo Shoot - Aaron Kah

    Model : Aaron Kah
    Location : City Centre, Newcastle
    Type : Fashion

    This shoot was to be one of the shoots that has come so close to happening in the past that I almost thought it would never happen, sometimes I couldn't make it sometime Aaron couldn't.

    But I am really happy that Aaron got back in touch about this shoot, as the end results are just amazing.

    For this shoot I had a clear idea of the kind if thing I was looking for, I wanted a city centre location to shoot a very high fashion set of shots, with Aarons look I knew this would work well. So after many months of conversations, we finally arranged the date for the shoot and it was all systems go.

    Location

    As I wanted there to be a clear image for this shoot of city environment, I knew just the right place. Newcastle city centre, having grown up in Whitley Bay and gone to college and university in the city I knew it was just the place to do this shoot.

    The great thing about Newcastle is it has a great mix of old and new, and the council have cleaned up the city so gone are the old dirty buildings, instead its now clean buildings, although still old. Mixed with new modern developments, glass, metal, etc.

    Newcastle is just a great city if you are looking to do a photo shoot and capture old and new in the same place.

    The Shoot

    We met at the Haymarket metro station, and headed straight down Northumberland Street, and thankfully my idea for the first set of shots were crowds of people and a busy street, which we got in abundance. The only problem is that when you want to shoot crowds, people are well mannered and tend to shy away from the camera. What this means is that when you take the shot, you get the crowd of people further away, and an actual space of empty around your model, not exactly the look I was going for.

    In order to play with this, it required me lying on the floor shooting at a different angle, capturing the crowds and people from this angle makes the shots just work.

    However, when Aaron and I were shooting we got approach by a group of girls asking to be in the shots, so we said yeah why not, they then kinda stayed in the background for a couple of shots, we almost had our our extras for our shoot, only problem was that they chose to wave at the camera, we I could not use the shots with them in. I think Aaron liked it though as he felt like he had his own entourage with him on the shoot.

    We them decided to change location and went around to the entrance of the new Monument Mall, we decided to shoot in the doorway, as I knew it would give me great light and high fashion feel I was after. So we did a few shots in the doorway, and there were two problems with this location. One was the mannequin in the window, which I had to photoshop out of the final shots. And two a busy body cleaner who decided to radio security about us doing a shoot in the doorway. But thankfully we had all the shots we needed before any security staff turned up and went on our merry way.

    Have to be honest, not sure why this cleaner chap had such a problem, we weren't even in the main mall, just in the doorway outside the doors. Some people!

    The next set of shots were taken a bit further down the road and made use of a new bench, like I said this modern bench looks really good in the old city environment, we also took some shots against the old buildings.

    This shoot was one of the quickest shoots I have done, and thanks to the professionalism of Aaron I got all the shots I could ever want, and he was an absolute pleasure to work with and took direction perfectly.

    I think I have proven in this shoot that its not about shooting off loads of shots, but more about taking your time composing your shots right and taking the shot only when you are happy, this shoot lasted about 1 hour and I came out with easily 14 good shots. So again huge thanks to Aaron for this shoot, I would recommend him to anyone looking for models to shoot with.

    But like I always say, you can be the judge of the shots for yourself.

    Sample shots from Newcastle City Centre Photo Shoot

    To see some of these shots in full size please visit my gallery on my website http://seanjconnollyphotography.co.uk/photography_gallery.htm


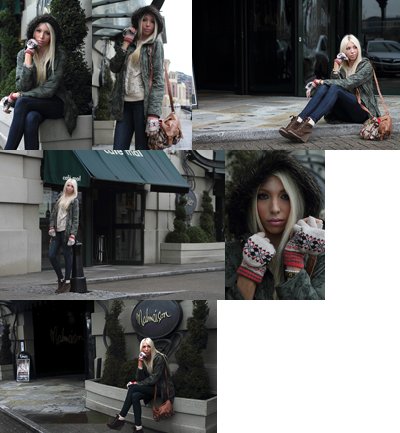
    Newcastle Quayside Editorial Photo Shoot - Jade Slavin

    Model : Jade Slavin
    Location : Quayside, Newcastle
    Type : Editorial

    At first this shoot took a while to organise getting both the location and people available, but once everything was set and after several emails about the shoot, look, feel etc it was all systems go.

    This shoot was to be one of an Editorial feel although Jade is really tall and has a great figure for fashion, I thought making use of her look would fit excellent into my editorial / fashion portfolio.

    Location

    This shoot was to be done at the newcastle quayside, although this shoot was to be a more urban shoot so it meant staying at the Millennium bridge end.

    This time I was going to make use of the existing businesses, steps, etc around the bridge to give me a set of shots that were clearly set in a city urban setting.

    The Shoot

    Now as it is just typical on a shoot of the location variety you cant control the weather, and yes you guessed it, for this shoot it was raining. There was a point before the shoot when it was almost called off, but I know the weather and decided to go ahead with the shoot, which worked out well as all we got was a minor shower.

    Have to say I was really impressed by Jade and the fact she was happy to work in this weather, and although it didn't rain too heavy, it did rain. So a huge thank you to Jade for working through it.

    At the start of the shoot we met at the Pitcher and Piano near the millennium bridge, we then set out trying to find the best location for the shots, without either of us getting too wet.

    I decided that the best place for these shots would be around the entrance to the Mal Maison, with Jade sitting down and go for a more editorial feel than on the fashion side.

    We did this and got some great shots.

    We then decided to try some more adventurous shots, Jade walking and due to her figure and height this meant that these shots worked well. Althought to be honest I need a little bit more practise with this style, but the idea is there and I will continue to work on it.

    Some of the best shots of the shoot were with Jade standing against bollards, posts etc, this is due to how tall she is as it is such a good contrast. We got some good shots of her standing, with a kinda waiting around feel to them. This was also due to the fact that there is a Taxi rank near the shoot so this is used in some of the shots.

    We did manage to also take some close up beauty shots, and again although the weather was wet Jade was happy to stand around so we could get these shots. So all in all this was a good shoot, I got some shots I can use, definately more on the editorial side but good shots that I am happy with.

    But again you can be the judge of the shots.

    Sample shots from Newcastle Quayside Photo Shoot
    To see some of these shots in full size please visit my gallery on my website http://seanjconnollyphotography.co.uk/photography_gallery.htm